Sunday, July 31, 2011

Thursday, July 28, 2011
Lightweight Portable Security - "US Air Force (Army) Linux" create your own USB drive
 Lightweight Portable Security (LPS) creates a secure end node from trusted media on almost any Intel-based computer (PC or Mac). LPS boots a thin Linux operating system from a CD or USB flash stick without mounting a local hard drive. Administrator privileges are not required; nothing is installed. The ATSPI Technology Office created the LPS family to address particular use cases. LPS-Public is a safer, general-purpose solution for using web-based applications. The accredited LPS-Remote Access is only for accessing your organization's private network.
Download the LPS 1.2.2 deluxe ISO from here. Then put it on an USB thumbdrive (1 GB should do it!) with Unetbootin. Ubuntu users will find it in the distribution's repositories.
sudo apt-get install unetbootin
Windows and Mac OSX users will find it here! Resulting USB drives are bootable only on PCs (not on Apple Macs!).
Open the downloaded .ISO file (LPS-1.2.2_public_deluxe.iso) with Unetbootin.

Be sure your USB drive is selected before hitting the OK button.
Shutdown your computer and boot from your USB thumbdrive. On my Acer Travelmate Timeline X 8172 Z I have just to hit F12 key during POST.
WiFi connections is established without any problems. Broadcom BCM43225 802.11b/g/n wlan chip is well supported.
Have fun with Leightweight Portable Security.
sudo apt-get install unetbootin
Windows and Mac OSX users will find it here! Resulting USB drives are bootable only on PCs (not on Apple Macs!).
Open the downloaded .ISO file (LPS-1.2.2_public_deluxe.iso) with Unetbootin.

Be sure your USB drive is selected before hitting the OK button.
Shutdown your computer and boot from your USB thumbdrive. On my Acer Travelmate Timeline X 8172 Z I have just to hit F12 key during POST.
WiFi connections is established without any problems. Broadcom BCM43225 802.11b/g/n wlan chip is well supported.
Have fun with Leightweight Portable Security.
Monday, July 25, 2011
LEGO Sports NBA - Sets 3427, 3549, 3562, 3563 and 3564
The Lego Basketball theme was licensed by the NBA in 2003. There were 27 Basketball sets released.
The minifigures in this theme had a special design. There are little springs in the legs, their larger arms and hands make it possible to shoot balls.
In 2011 (8 years after the release) these are really hard to find sets.
In 2011 (8 years after the release) these are really hard to find sets.

3562 NBA Collectors #3
-Gary Payton
-Dirk Nowitzki
-Vince Carter

3563 NBA Collectors #4
-Toni Kukoc
-Jason Kidd
-Kobe Bryant

3564 NBA Collectors #5
-Allen Iverson
-Steve Francis
-Karl Malone

3427 NBA Slam Dunk
The set contains a minifigure, a basketball hoop and a skateboard.

3549 NBA Practice Shooting
Saturday, July 23, 2011
Logitech Webcam Pro 9000 - running under Ubuntu 11.04 Linux
This is my Logitech Webcam Pro 9000:

As UVC-compliant it should be working under Ubuntu 11.04 right out of the box.
In a terminal lsusb is giving back:
Bus 002 Device 004: ID 046d:0809 Logitech, Inc. Webcam Pro 9000
You can also find the camera in the /dev/v4l folder.
To see if the camera is working properly I am using guvcview.
Download and install the GTK+ UVC Viewer (guvcview) with:
sudo add-apt-repository ppa:pj-assis/ppa
sudo apt-get update
sudo apt-get install guvcview
This will install the packages guvcview, libwebcam0, uvcdynctrl and uvcdynctrl-data to your system.
Starting guvcview will show you that the camera is working, but not all controls are available:

For example AutoFocus and focus controls are missing. So there should be a way to use the built-in AutoFocus (with Carl Zeiss lens system!).
What we need is a valid configuration-file from the quickcamteam. The file is named logitech.xml.
Download the file in a terminal with:
wget http://svn.quickcamteam.net/svn/qct/webcam-tools/trunk/uvcdynctrl/data/046d/logitech.xml
install the configuration file with
sudo uvcdynctrl -i logitech.xml
Restart guvcview:

AutoFocus and focus adjustment is now fully operational.
If you need the camera controls in different program start guvcview --control_only from a terminal. I you do not like the guvcview control panel you can either use V4L2UCP, which is available thru Ubuntu Software Center.
This should work with the older Logitech Quickcam Pro 9000 as well. Its hardware is quite similar.
ATTENTION: It appears that the Quickcamteam website is down at the moment and logitech.xml cannot be downloaded at the moment. Please look here to download the file, if you need it.

As UVC-compliant it should be working under Ubuntu 11.04 right out of the box.
In a terminal lsusb is giving back:
Bus 002 Device 004: ID 046d:0809 Logitech, Inc. Webcam Pro 9000
You can also find the camera in the /dev/v4l folder.
To see if the camera is working properly I am using guvcview.
Download and install the GTK+ UVC Viewer (guvcview) with:
sudo add-apt-repository ppa:pj-assis/ppa
sudo apt-get update
sudo apt-get install guvcview
This will install the packages guvcview, libwebcam0, uvcdynctrl and uvcdynctrl-data to your system.
Starting guvcview will show you that the camera is working, but not all controls are available:

For example AutoFocus and focus controls are missing. So there should be a way to use the built-in AutoFocus (with Carl Zeiss lens system!).
What we need is a valid configuration-file from the quickcamteam. The file is named logitech.xml.
Download the file in a terminal with:
wget http://svn.quickcamteam.net/svn/qct/webcam-tools/trunk/uvcdynctrl/data/046d/logitech.xml
install the configuration file with
sudo uvcdynctrl -i logitech.xml
Restart guvcview:

AutoFocus and focus adjustment is now fully operational.
If you need the camera controls in different program start guvcview --control_only from a terminal. I you do not like the guvcview control panel you can either use V4L2UCP, which is available thru Ubuntu Software Center.
This should work with the older Logitech Quickcam Pro 9000 as well. Its hardware is quite similar.
ATTENTION: It appears that the Quickcamteam website is down at the moment and logitech.xml cannot be downloaded at the moment. Please look here to download the file, if you need it.
Thursday, July 21, 2011
My first (kind of) brickfilm - Cobi Light Gamma Helicopter review
So... ...this is my first brickfilm.
I shot the stills for the animation with a Canon PowerShot A40, using Canon Remote capture (WinXP). The rendering (also resizing and cropping) was done with AVIDEMUX under Ubuntu 10.04.
It is a review of the COBI 2115 Small Army Light Gamma Helicopter.
I shot the stills for the animation with a Canon PowerShot A40, using Canon Remote capture (WinXP). The rendering (also resizing and cropping) was done with AVIDEMUX under Ubuntu 10.04.
It is a review of the COBI 2115 Small Army Light Gamma Helicopter.
Welcome home Atlantis! Farewell Space Shuttle! The end of an era....
STS-135 successfully ended on July 21st 2011. The space shuttle Atlantis returned safely from its last mission, marking marking the end of NASA's 30-year space shuttle program.
As a tribute I built my own "Lego Space Shuttle"...
..and I bought a new one! Lego City 3367.

..and I bought a new one! Lego City 3367.

Wednesday, July 20, 2011
Hackintosh - How to re-enable audio after software update to MacOS X 10.6.8
On my hackintosh I'm using a Gigabyte GA-EP45-UD3LR. I've installed Mac OS X 10.6 with KAKEWALK from a retail Snow Leopard DVD I purchased from our local Apple store.
As I updated from 10.6.7 to 10.6.8 via software update audio functions were totally gone. I used to keep a backup of my AppleHDA.kext, re-installing this kext brings audio function back. I am not using VoodooHDA or legacyHDA. If these are there - delete them.
This method is easy, all you need is kext utility (registration neccessary!)
Step 1: Delete the new AppleHDA.kext that came with the software update (you will find it in your system/library/extensions folder):
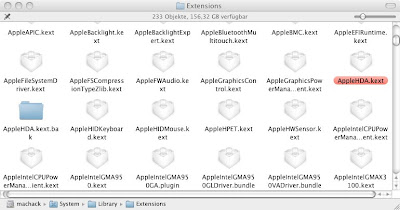
you'll need your root password!
Step 2: Open your backup of your old AppleHDA.kext with kext-utility:
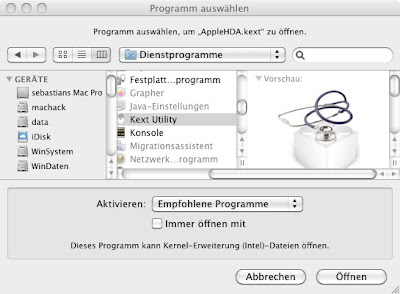
...hit "open" and enter your root password!
Step 3: Wait for a moment:
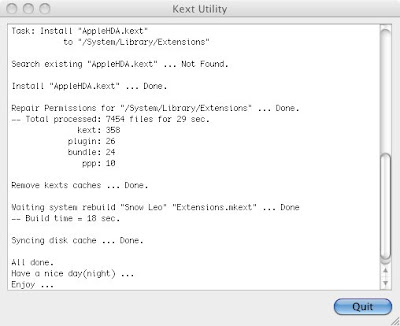
...kext utility just installed your old AppleHDA.kext.
After a reboot your sound should be working again!
As I updated from 10.6.7 to 10.6.8 via software update audio functions were totally gone. I used to keep a backup of my AppleHDA.kext, re-installing this kext brings audio function back. I am not using VoodooHDA or legacyHDA. If these are there - delete them.
This method is easy, all you need is kext utility (registration neccessary!)
Step 1: Delete the new AppleHDA.kext that came with the software update (you will find it in your system/library/extensions folder):
you'll need your root password!
Step 2: Open your backup of your old AppleHDA.kext with kext-utility:
...hit "open" and enter your root password!
Step 3: Wait for a moment:
...kext utility just installed your old AppleHDA.kext.
After a reboot your sound should be working again!
Subscribe to:
Posts (Atom)